An Introduction to DIY Laundry Renovation
If you’re planning a DIY laundry renovation with a very limited budget (AU$1500), this guide will take you through most steps, from replacing old tile splashback, covering a brick wall with plasterboard and painting, replacing old taps, and fitting new skirting boards. We’ll also provide some traditional, but very practical storage recommendations for accessories to maximise your laundry space.
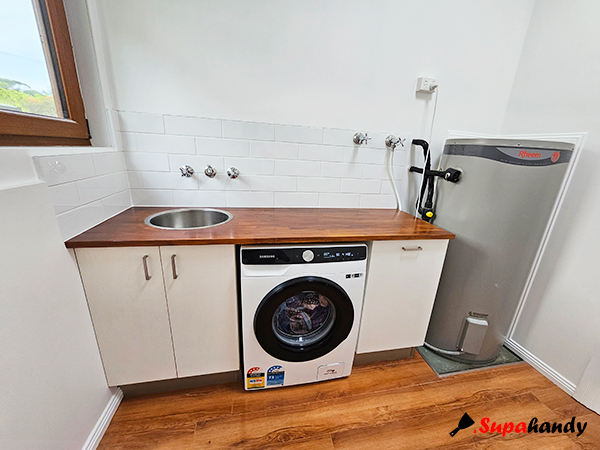
Replacing old splashback is one of the most common steps when you want change your laundry. Twenty or thirty-year-old tiles are mostly faded with age, and most of their styles are outdated. White, or some light neutral colour, is the most popular splashback colour, chosen for its ability to brighten spaces and suit any design style.
Covering a brick wall with plasterboard is an economical way to change a brick wall to a smooth surface for painting and enhance the overall appearance of your rooms. Brick walls can be dark, uneven, dusty, and difficult to clean, while covering a brick wall with plasterboard is a great option for achieving a clean, modern look.
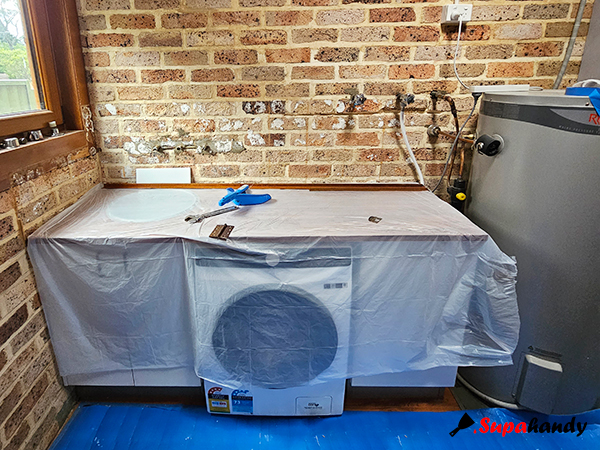
Same to taps, sink, cabinet and skirting boards, after years of wear and tear, their finishes become faded or chipped, and their styles are outdated. From the following photo, we can see, in our case, that the sink and cabinet had been replaced years before, and their condition looks okay.

Replacing Old Tile Splashback
Materials and Tools Needed for Replacing Splashback
- Demolition tools: Chisel, hammer, scraper
- Tiling materials: New tiles, tile adhesive, grout powder, Aluminium L-shaped tile trims
- Tiling tools: Tile spacers, tile cutter (or Wet Saw)
- Grout tools: Sponge and bucket
- Caulking silicone sealer and gun
Installation Steps
- Remove old tiles – Use a chisel and hammer to carefully demolish the existing tiles.
- Prepare the wall – Scrape off old adhesive and clean the surface.
- (Optional) Stick 6mm fibre cement underlay flooring (or Villaboard) – This underlay makes an even surface for laying tiles, especially necessary for smaller-sized tiles.
- Apply tile adhesive – Spread evenly using a notched trowel.
- Lay the new tiles – Use tile spacers for even gaps and press firmly into place.
- Finish tile edges with aluminium L-shaped tile trims – Aluminum trims give a neat and professional look to all tiling jobs and provide rounded or rectangular corners to create a strong finish.
- Allow adhesive to dry – Wait 24 hours before applying grout.
- Apply grout – Use a grout float to fill gaps between tiles, then wipe excess with a damp sponge.
- Caulk internal corners between walls and cabinet – apply waterproof silicone sealer to the internal corner between walls and laundry cabinet bench.
Covering the Brick Wall with Plasterboard
Basic Materials and Tools Needed for Covering a Brick Wall with Plasterboard
- CSR (or Knauf) Plasterboard sheets
- Plasterboard adhesive
- Timber battens and screws
- CSR (or Knauf) Jointing compound and tape
- Sandpaper (150 – 180 grit)
- Utility knife or plasterboard saw
- Spirit level
- Measuring tape
Installation Steps
- Preparing the Brick Wall
- Clean the wall – Remove dust, grease, and debris.
- Check for moisture – If present, apply a waterproof membrane.
- Fixing Plasterboard to Brick (Adhesive Method)
- Apply plasterboard adhesive in 20-30cm dabs on the brick wall.
- Press the plasterboard sheet into place, ensuring it’s level.
- Hold for a few minutes before installing other sheets.
- Let the new plasterboard dry for 1-2 hours before setting finishing.
- Fixing Plasterboard to Brick (Timber Batten or Steel Furring Channel Method)
- Attach timber battens (or Furry channel) vertically every 400-600mm using masonry anchors.
- Fix the plasterboard to the battens using drywall screws every 300-400mm.
- Finishing the Joints
- Apply joint mash (or paper) tape over the sheets’ joints.
- Spread joint base compound over the tape, smoothing it out before drying.
- Repeat spreading base joint compounds, another 1 coat of base.
- Smooth and spread 1 coat of top joint compound.
Note
- Please refer to details guide of sticky plasterboard on brick wall from How to Gyprock over Internal Brick Wall – the Total Instruction about Gyprock Brick Wall Benefit and Defects.
- As to the exposed power socket and cables, it’s recommended to be improved by an electrician. In this case, exposed cables had been covered with plasterboard by plastic trim finishing around the exposed socket.
Installing Cornice
Materials and Tools Needed for DIY Cornice Installation
- 90mm cove cornice (which is one classical and most popular styles)
- Cornice adhesive
- Mitre box and handsaw
- Sponge block
Installation Steps
- Measure and cut the cornice using a mitre box (45° angles for corners).
- Apply cornice adhesive to the back edges of the cornice.
- Press and lightly smack the cornice into place along the ceiling edge to allow it to adhere.
- Add extra screws or nails to secure the cornice further, and fill and patch screws holes.
- Fill gaps with cornice cement, clean, and remove excess cement using a water-soaked sponge block.
- (Optional) Patch and sand smooth joint gaps.
Replacing Old Laundry Taps
Tools Needed for DIY Laundry Tap Replacement
- New mixer or standard laundry taps
- Adjustable wrench
- Plumber’s tape
- Bucket and rags
Installation Steps
- Turn off the water supply and drain the remaining water from pipes.
- Use a wrench or spanner to loosen and remove the old taps slowly.
- (Optional) Install brass hex nipples to adjust the tap installation leverage.
- Wrap plumber’s tape around the new tap’s threads.
- Install the new taps and tighten securely.
- Turn the water back on and check for any leaks.
Installing New Skirting Board
Materials Needed for DIY Laundry Renovation
- FJ Primed DAR or hardwood skirting moulding (we don’t recommend the MDF moulding for a laundry moisture environment)
- Construction adhesive and galvanised masonry anchor screw (6mm-8mm recommended)
- Mitre saw
- No more gap filler
Installation Steps
- Measure and cut skirting boards at 45° angles for corners.
- Apply construction adhesive to stick on plasterboard walls and secure with a masonry anchor every 500-800mm on brick walls.
- Fill nail holes with wood filler and sand smooth when drying.
- Press firmly into place.
- Fill the gaps between the wall and skirting with no more gap filler.
Painting the Ceiling and Walls, and Skirting
Materials Needed for DIY Laundry Renovation
- Moisture-resistant paint
- Paint rollers and brushes
- Painter’s tape
- Drop sheets
- Primer and top paint
Installation Steps
- Fill any holes and sand the top joints and patched holes with setting compound.
- Freshly paint the ceiling first with a roller.
- Cut in the edges with a brush.
- Apply painter’s tape to protect tiles, aluminium trims, and windows/doors trim.
- Paint the walls, using a “W” pattern for an even coat.
- Apply a second coat if needed after drying.
Material Costs for DIY Laundry Renovation
| Items | Materials Cost | Labors |
| Plasterboard & Adhesives | $350 | 2 |
| Cornice & its Adhesives | $100 | 2 x 0.5 |
| New Taps | $100 | 1 |
| Skirting Board | $50 | 0.5 |
| Wall Cabinets | $400 – $600 | 1 |
| Sand & Paint | $300 | 2 |
| Total Estimated Cost | $1300 – $1500 | 7-8 |
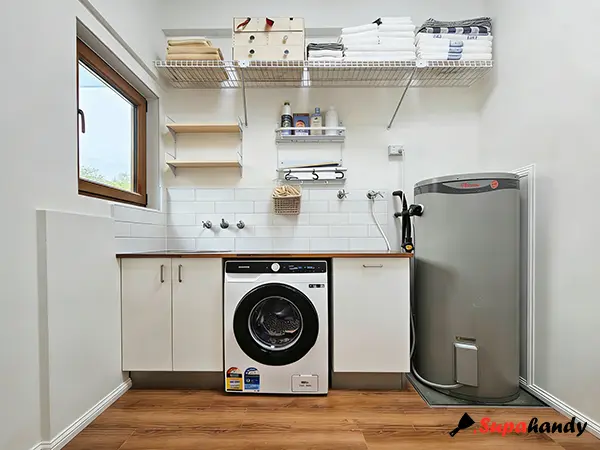
Additional Storage & Organisation Ideas for DIY Laundry Renovation
Consider a steel wall bracket/shelf, laundry bucket, or bin for storing small items, like bleach pens, stain removers, and lint rollers, and a small sewing box with needles and threads in a variety of colours on the shelf in the laundry so buttons and snaps can be repaired on the spot.
Steel shelf widespread use in residential laundry rooms since the late 19th century, while they are still attractive for many homeowners because the steel brackets/shelves are very highly durable, resist moisture and heat, and can also support much heavier stuff.
- Install wall brackets/shelf to store small laundry aids (e.g., detergent, stain removers).
- Use a laundry bucket or bin for accessories like bleach pens and brushes.
- Add a sewing box with different colour threads and needles for a quick fabric repair.
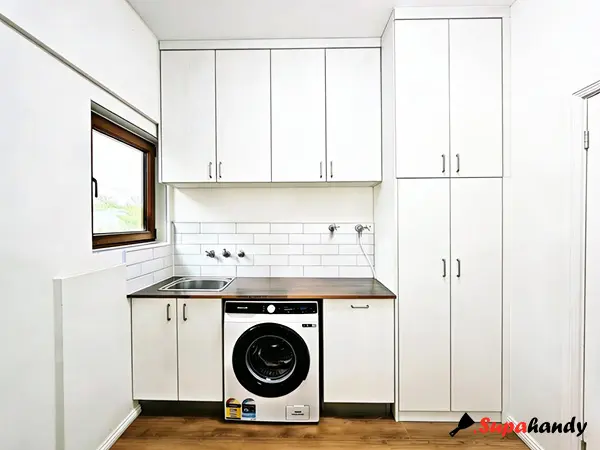
The Melamine Cabinet is the Standard Choice For Laundry
Melamine cabinet become a standard choice for residential laundry rooms due to their cost-effectiveness and clean look since middle 20th century. Even having less durability and less bearing than steel shelving, melamine particleboard, or MDF creates a much nicer surface finish with daily or minor resistance to scratches, moisture, and impact.
IKEA cabinets can be the cheapest and easiest DIY choice to create a nice-looking laundry with extra storage. Or using some good local joinery factory to custom make the laundry wall cabinet is well deserved if you have extra budget on your laundry renovation project (more Supahandy’s joinery jobs can be referred to on Supahandy’s Facebook).
Conclusion
A well-planned DIY laundry renovation can improve functionality and looks while increasing your home’s value. By covering brick walls with plasterboard, replacing the outdated tile splashback, installing ceiling cove cornices, replacing taps, adding storage solutions, and repainting the ceiling and walls, a refreshed and efficient laundry space.
Whether you’re tackling your laundry renovation alone or hiring professionals, this guide provides a good reference to help you to achieve a successful low-budget DIY laundry makeover.
Let us know if you need more tips or cost-saving recommendations!