Introduction to How to Install Plasterboard Ceiling 简介
This guide provides a simple and practical overview of how to install plasterboard ceiling.
本指南简明扼要地介绍了石膏天花板的安装方法。
It introduces the most two common ceiling support systems used in Australian residential and commercial property: direct-fixed and furred (suspended). It also outlines the key technical tips for securely installing plasterboard ceilings using the two most common fixing methods: screws combined with adhesive, and screws only.
文中介绍了澳大利亚家庭和商业建筑中最常见的两种固定天花的系统:直接固定式和吊顶式(龙骨结构)。同时,也介绍了两种最常用的用于固定石膏天花板的方法:螺钉结合石膏板蓝胶,和仅使用螺丝固定石膏天花板的安装方法。
By following the outlined methods, you’ll be able to carry out plasterboard ceiling installations efficiently. The focus is on selecting the right methods for different scenarios to ensure a strong, durable plasterboard ceiling.
按照本指南中列出的步骤方法,您将能够高效地完成天花板的安装工作。文章重点放在针对不同的应用环境,应采用不同的方法,以确保建造的天花结构稳固、效果持久。
Plasterboard Ceiling Installation Basic Rules 石膏天花板安装基本规则
Plasterboard sheets should be installed perpendicular to the ceiling or wall framing. Ideally, critical light should fall along the recessed joints to reduce the visibility of imperfections. To minimize butt joints, it is recommended to use full-length sheets wherever possible.
石膏板应垂直铺设于天花板或墙体的框架结构上。为减少因光照造成的接缝可见度,建议让关键光源沿着凹缝方向照射。为了尽量减少石膏板切割端的对接缝,建议在条件允许的情况下尽量使用整张石膏板材。

Plasterboard Ceiling Framing Options 石膏板天花板框架选择
There are two general support framing options for ceiling linings: Ceiling linings can be fixed directly to main timber or steel framing, or alternatively to secondary members such as furring channels and battens.
石膏天花板有两种主要的框架支撑方式:可直接固定于主结构木框架或钢框架上,或固定于龙骨条和木条等次级框架构件上。
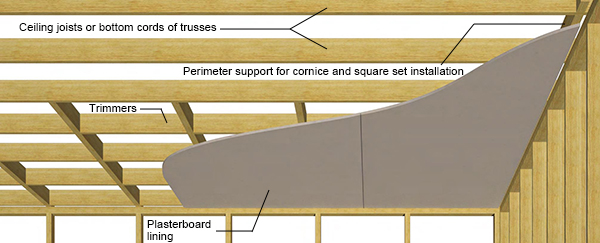
Direct Fixing Plasterboard Ceiling 直接固定式石膏板天花板
Direct fixed ceiling involves fixing plasterboard sheets directly to structural ceiling members (timber or steel). When plasterboard is fixed in this way, trimmers must be installed by the builder at points where the primary ceiling supports — such as girder trusses and joists — change direction within the room.
直接固定式天花是将石膏天花板直接固定于主结构框架横梁上(木框架或钢框架)。当石膏板采取这种方式固定时,施工人员需要在房间内主要天花板支撑横梁构件(如主梁桁架和搁栅)改变方向的地方安装修整条。
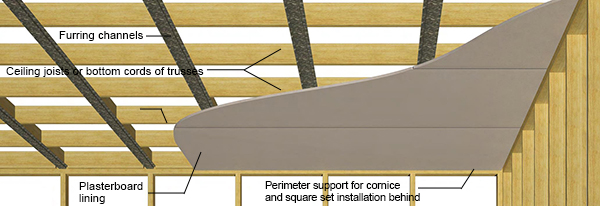
Furred Ceiling 吊顶式天花板
Furred or battened fixing involves fixing plasterboard sheets to secondary framing members, such as metal or timber battens, or metal furring channels, which are installed perpendicular to the primary structural members.
吊顶或木条固定是指将石膏板固定在与主框架方向垂直的次级框架横梁构件上,比如金属或木质板条,或金属空腔龙骨。
Plasterboard Ceiling Fixing 石膏天花板的固定
Fixing With Combination of Adhesive and Screw Fasteners 使用粘合剂和螺丝紧固件组合进行固定
General Fixing Notes for how to install plasterboard ceiling 通用固定说明
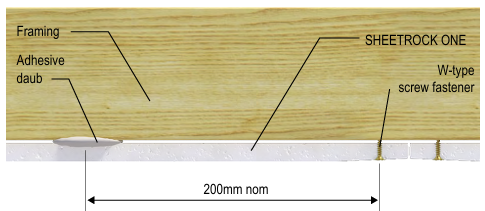
- Framing members insert (timber or steel) should be clean and free from dust, dirt, grease and surface moisture.
框架构件(木材或钢材)应保持清洁,无灰尘、污垢、油脂和表面水分。 - Refer to General Screw and Nail Fixing.
参考通用螺丝和钉子固定方法。 - Stud adhesive daubs should be approx 25mm diameter x 15mm high.
粘结点的直径应约为25毫米,高度约为15毫米。 - Do not apply adhesive at the ends of the sheets.
不要在板材的端部涂抹粘合剂。 - Keep daubs approximately 200mm away from sheet edges.
粘结点应距离板材边缘约200毫米。 - Keep daubs 200mm (nom) from screw points.
粘结点应距离螺丝固定点约200毫米。 - For the perimeter of the sheet, space screws at a maximum of 300mm centres for cornices and 150mm centres for a square set finish.
在板材边缘,檐口处螺丝的最大间距为300毫米,方形饰面处的最大间距为150毫米。 - Full perimeter support framing should be provided in each room to fix plasterboard edges.
每个房间都应提供完整的周边支撑框架,以固定石膏板的边缘。 - Take care not to slide the plasterboard sheet once it is in contact with adhesive, to prevent the adhesive from spreading too thin.
一旦石膏板与粘合剂接触,注意不要移动石膏板,以防止粘合剂扩散变薄。
1/3 Fixing Method (Preferred) 1/3固定法(推荐)
Space fasteners at 1/3 points across the width of the sheet, with daubs placed halfway between fasteners.
沿板材宽度方向的1/3处设置固定件,并在固定件之间的中间设置粘结点。
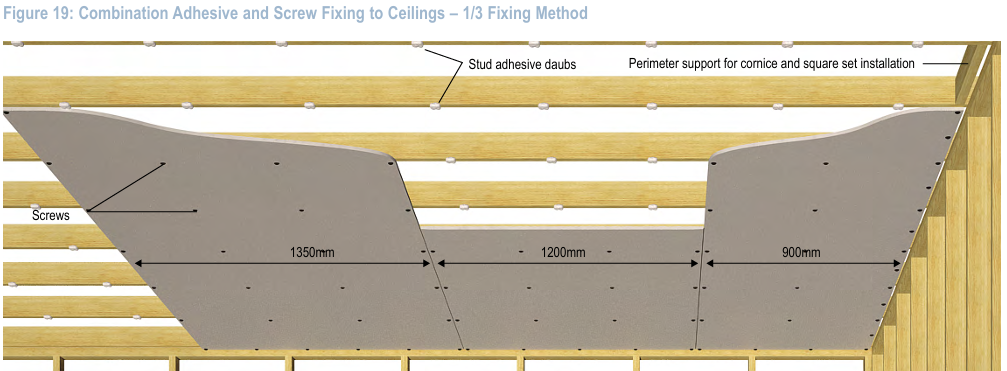
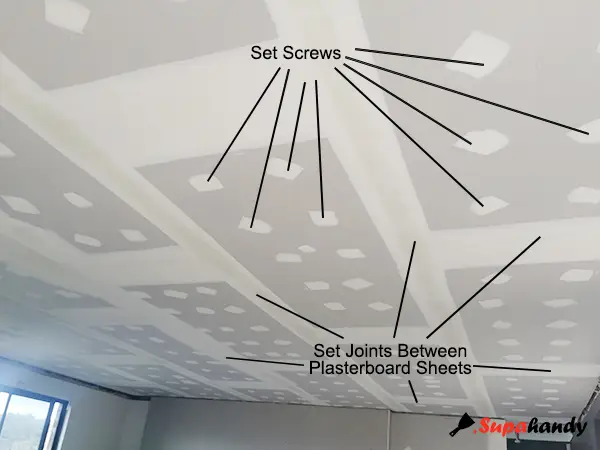
When you see there are two (or three) set screws between each two joints settings, it likes used this 1/3 screw fixing combined with adhesive method.
Conventional Method 传统方法
Use double fasteners 50-75mm apart along the sheet centreline and space daubs between the fasteners at 230mm maximum centres.
沿板材中心线使用间距为50-75毫米的双螺钉(或钉子)紧固件,并在紧固件之间以最大230毫米的间距设置粘结点。
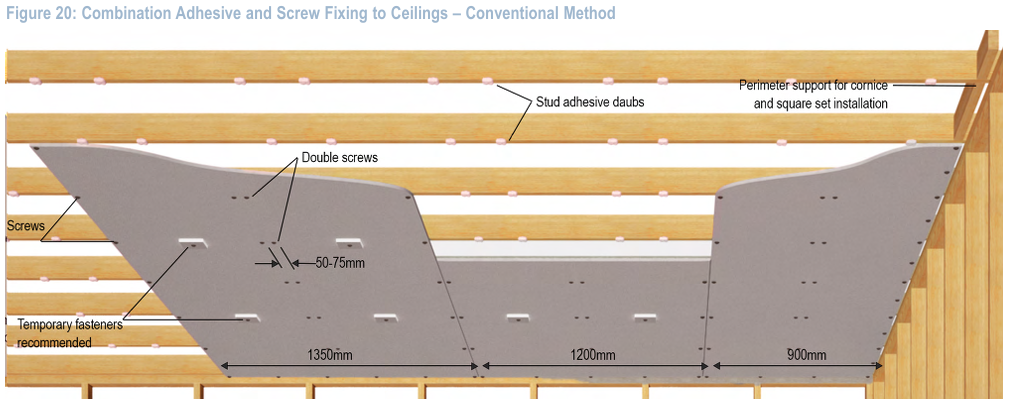
When using the conventional method, temporary fasteners (nails or screws driven through plasterboard blocks to hold sheets in place while the adhesive cures) should be installed at every second framing member and should remain in place for at least 24 hours.
在采用传统方法时,临时固定件(用钉子或螺丝穿过石膏板块来固定面板,以便在石膏胶固化期间保持石膏面板不发生下垂弯曲)应安装在每间隔一个支撑横梁框架的位置上,并且应至少保留24小时。
Many plasterers prefer this fixing method in practice, but neglect using temporary fasteners, because it speeds up the sheeting process by requiring fewer screws. But if there is only screws along plasterboard sheet’s centreline (and the joints), the ceiling plasterboard (especially the most 10mm plasterboard) would be starting to be sagging since this plasterboard ceiling just installed. This is one of the main reason we can see many sagging plasterbaord ceiling today.
很多石膏板工人在施工中喜欢使用这种固定方式,因为它只需要较少的螺丝,能加快贴石膏板的速度;但同时多数人不会使用临时固定件。假如只用螺钉沿着石膏板的中心线(和两侧的接缝)固定石膏板,石膏板(特别是用的最多的10个毫米厚的)会自从钉在天花框架横梁上的那一刻就有可能开始发生下垂现象。这也是今天我们会看到许多石膏天花板有下垂问题的主要原因之一。
Ceiling Fastener and Adhesive Layouts 天花板紧固件和粘合剂布局
The following table coming from CSR The Red Book shows the ceiling fastener and adhesive layouts for both methods.
下表(来自CSR的安装手册)列出了搭配使用螺钉和粘合剂固定石膏天花板时两种方法的分布规则。
| Plasterboard Width(mm) | Minimum Number and Placement of Adhesive Daubs and Fasteners across sheet | |
| Conventional Spacing | 1/3 Spacing | |
| 900 | F A F/F A F | F A F A F |
| 1200 | F A A F/F A A F | F A F A F A F |
| 1350 | F A A F/F A A F | F A F A F A F |
Notes: F=Fastener; A=Adhesive Daub ; F/F = 1 Screw or 2 Nails at 50-75mm apart
(from CSR The Red Book)
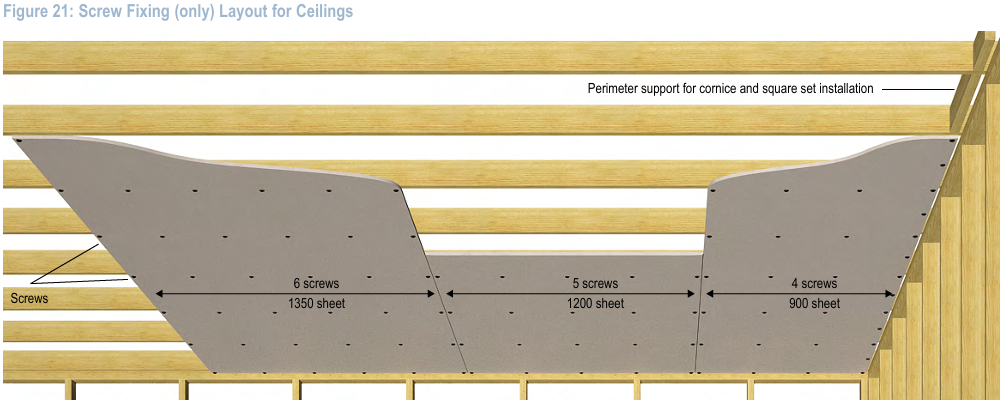
Fixing With Screws Only 仅用螺丝固定
Firstly, space screws at a maximum 300mm centres across the width of the plasterboard sheet.
首先,在板材宽度上,固定石膏板的螺钉间距最大为300毫米。
Additionally, at plasterboard sheet ends, space screws at a maximum of 300mm centres for cornices and 150mm maximum centres for square set finish.
此外,在板材两侧的端部,檐口结束的天花上,固定螺钉间的最大中心距为300毫米,直角结束的天花上,固定螺钉间的最大中心距为150毫米。
The number of screws across one full width sheet depends on the width of the plasterboard sheet – wider plasterboard sheets generally require more screws for proper fixing.
对于不同宽度的天花板,也分别有不同数量要求的螺钉。总体上是板材越宽,螺钉个数越多。
| SHEET WIDTH | SCREW POINTS |
| 900mm | 4 |
| 1200mm | 5 |
| 1350mm | 6 |
Note: Screw points should be equally spaced (nom).
注意:螺丝固定点的间距应该大体上均分。
This blog introduces the very basic concepts and highlight some key notes on how to install plasterboard ceiling. Hope this bilingual guide can especially help the hundreds and thousands of Chinese plasterer working in Sydney or Australia.
这篇文章仅介绍了石膏板天花板安装的基本概念,并列出了一些关键要点。希望这份中英双语指南能帮助在悉尼或澳大利亚工作的成百上千的中国泥水匠。
Most of the technical details are based on CSR The Red Book and Knauf Plasterboard Installation Manual, combined with our years of hands-on experience in real-world plasterboard ceiling installation projects. For more details please also refer to CSR The Red Book and Knauf Plasterboard Installation Manual.
多数技术细则来自CSR红皮书和Knauf石膏板安装手册,并结合我们多年从事石膏板天花安装项目中的经验。更多详细技术信息也请参考 CSR红皮书和 Knauf 石膏板安装手册。
Due to the limitations of our capabilities and knowledge, there may be errors or missing details. If you notice anything or have additional information to share, please feel free to leave a comment below – we’d greatly appreciate your feedback.
由于我们能力和知识的局限,内容中可能存在错误或遗漏。如果您发现问题或有补充信息,欢迎在下方留言,我们非常感谢您的反馈。
Related Articles: 相关文章:
Reference: 参考文献:
- The Red Book – Residential and Commercial Systems – CSR
CSR红皮书 – 住宅和商业系统 - Knauf Plasterboard Installation Manual
Knauf石膏板安装手册